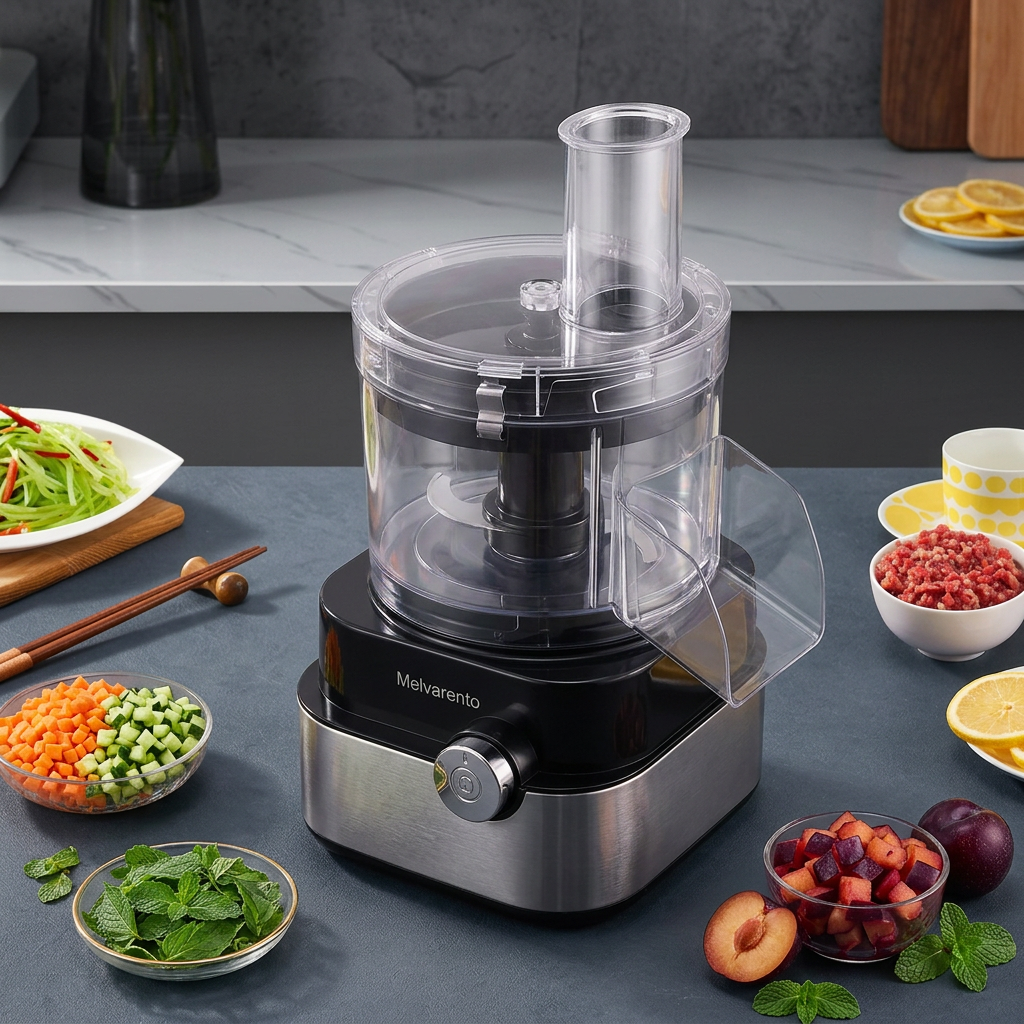
Melvarento Multifunction Electric Food Chopper — Countertop Ingredient Preparation with Clear Processing Chamber & Rotary Control
Melvarento Multifunction Electric Food Chopper — Countertop Ingredient Preparation with Clear Processing Chamber & Rotary Control
Couldn't load pickup availability

Melvarento Multifunction Electric Food Chopper — Countertop Ingredient Preparation with Clear Processing Chamber & Rotary Control
🥕 Dinner Starts Before the Pan Gets Hot
You have decided what to cook. The ingredients are on the counter. Now comes the part between the idea and the meal: preparing everything so you can actually begin.
It is a familiar stretch of kitchen work. Washing, sorting, trimming, checking the recipe, and making room for the next ingredient. When that stage feels scattered, even a simple dinner can feel like several separate projects.
The Melvarento Multifunction Electric Food Chopper gives ingredient preparation a dedicated place on your countertop. Its clear processing chamber, tall feed chute, front rotary control, and black-and-silver base create a defined station for compatible chopping tasks.
Bring your ingredients together. Give preparation a rhythm. Make the step before cooking feel more considered.
The Prep List: Choose the Meal Before the Method
Start with what your recipe needs, not with the assumption that every ingredient should be processed the same way. A rustic vegetable mixture, a fine garnish, and a precisely sliced salad have different requirements. Choose a task supported by the appliance and its fitted attachment, then organize your ingredients around that task.
Check the supplied manual for permitted foods, required preparation, attachment selection, and processing limits. The word multifunction does not mean every ingredient, every texture, or every cutting style is supported.
Before turning anything on, wash and prepare suitable ingredients as required. Remove packaging and any hard parts that the instructions exclude. Cut ingredients to the recommended starting size rather than forcing oversized pieces into the feed opening.
🌶️ Follow the Ingredient Path
At the top: a defined feed opening
The reference design has a tall transparent feed chute above the lid. This gives the appliance a distinct entry point and keeps the feeding area separate from the control knob below. Use the matching food pusher specified for the unit, never your fingers or an improvised utensil.
Prepare ingredients to fit the approved feed size. If something catches or will not move as intended, stop the machine and disconnect it before addressing the problem according to the instructions. Extra force is not a substitute for correct preparation.
In the middle: a clear processing chamber
The transparent chamber makes the working area visible from outside. That visibility helps you stay aware of what is happening without opening the assembly during operation. Keep the lid secured and wait for all moving parts to stop before inspecting or removing contents.
The material's clear appearance is not a claim about its composition, temperature resistance, or dishwasher suitability. Treat it according to the care instructions supplied with your exact unit.
At the side: a visible outlet shape
The pictured configuration includes a curved transparent side outlet. Keep the area around it clear and arrange any collection container as directed by the manual. Do not reach into an outlet or attempt to clear residue while the appliance is powered.
How ingredients move through the machine depends on the fitted assembly and operating method. The reference photograph does not establish a particular throughput, continuous-feed capacity, or guaranteed cut size.
At the front: a rotary control
A round silver-colored knob sits on the front of the black-and-silver base. Its contrasting shape gives the control area a clear visual position. Consult the manual for the knob positions and supported settings; no number of speeds, pulse function, or automatic program is promised here.
A Recipe-First Approach to Everyday Cooking
For a vegetable-centered dinner: set out the ingredients your appliance is approved to process and keep the remaining recipe components separate. Prepare in manageable batches, checking the texture between batches only after stopping safely.
For a meal with several additions: organize ingredients in small bowls before you begin. Process compatible items separately when their texture or cooking requirements differ, rather than assuming one mixed batch will suit the recipe.
For a prep-ahead session: plan what you will use and where it will go afterward. Keep prepared ingredients covered and store them appropriately; the chopper prepares food but does not cook, refrigerate, or preserve it.
The useful outcome is not an identical pile of perfect cubes. It is a preparation routine that matches your actual meal, with the right expectations for the attachment and ingredients you are using.
🧅 The Countertop Choreography
- Set the stage. Put the appliance on a stable, dry work surface with room for prepared ingredients and a suitable collection bowl. Check the electrical rating and inspect the unit before connecting power.
- Assemble before switching on. Fit only the components specified for the chosen task. Secure the chamber, cutting assembly, lid, and any required collection parts exactly as instructed. Do not rely on an assumed safety interlock.
- Prepare a manageable amount. Use the recommended ingredient size and batch limits. Keep hard, frozen, sticky, or very fibrous foods out unless the manufacturer explicitly approves them for that assembly.
- Feed with the correct tool. Follow the operating method and use the supplied compatible pusher where required. Keep hands, hair, clothing, and utensils away from every opening and moving part.
- Pause before checking. Switch off, disconnect power, and wait for complete movement to stop before opening, adjusting, or clearing the machine. Observe the specified duty cycle and cooling intervals.
- Finish the recipe, then reset. Transfer the prepared ingredients using a suitable method with the machine disconnected. Clean permitted parts according to the instructions and dry them before storage.
The Weeknight That Feels Less Scattered
Imagine coming home with dinner already in mind. Instead of beginning with a crowded worktop, you clear one space, set out the bowls, and sort the ingredients by what the recipe actually needs.
You check the selected attachment, prepare the suitable vegetables, and work through a manageable amount. There is a place for the ingredients waiting to be processed and a place for the prepared portions afterward. You pause to assess the texture safely, then move on to the next cooking step.
The pan is ready when you are. Your preparation has a sequence instead of a scramble. That is the kind of difference a dedicated countertop tool can make: not replacing your judgment, but giving it a more organized setting.
🫑 Texture Is a Choice, Not a Universal Promise
Ingredient firmness, starting size, attachment type, batch size, and processing method can all influence the result. Start with an approved task and assess what the food needs. Do not assume that running the appliance longer will create the particular texture your recipe requires.
Precision dicing, slicing, shredding, kneading, blending, and meat grinding are distinct functions. They require confirmed compatibility and the appropriate hardware. This page does not promise those functions merely because prepared foods appear around the product in a styling image.
If an exact cube size or a specialized function matters to your purchase, verify the cutting attachment and specifications for the unit first. A clear expectation makes the tool more useful than an impressive but unverified claim.
The Practical Questions
Can it process raw meat, ice, or nuts?
Do not assume so. Check the manufacturer's approved ingredient list and attachment requirements. No meat-grinding, ice-crushing, or hard-nut-processing capability is established on this page.
Does it guarantee uniform cubes?
No. Uniform dicing requires a confirmed dicing assembly and operating specifications. The reference image alone does not verify that capability or a specific cut dimension.
Can I add hot liquids or use it as a blender?
No blending or hot-liquid suitability is claimed here. Use the appliance only for the tasks and temperatures expressly permitted in its instructions.
Are all parts dishwasher-safe?
That has not been confirmed. Disconnect power before cleaning, handle cutting components carefully, and wash only the parts and methods permitted by the manual. Never immerse the motor base or wet electrical connections.
What are the capacity, power, and included attachments?
Verified bowl capacity, wattage, speed count, and accessory inventory have not been supplied. Check the exact package specifications before purchase rather than inferring them from the product's appearance or lifestyle props.
🍲 Put the Enjoyment Back into the Next Step
The best part of preparing a meal is seeing separate ingredients begin to become something you want to eat. A clearer workflow leaves more room to enjoy that moment.
With its visible processing area, defined feed chute, and front rotary control, the Melvarento Multifunction Electric Food Chopper brings a purposeful preparation station to your kitchen for supported household tasks.
Choose the recipe. Prepare with intention. Let Melvarento take its place in your everyday cooking routine.